faq:email:mail_setup_win_live_mail_imap
This is an old revision of the document!
Email Setup Guide for Windows Live Mail (IMAP)
Open your Windows Live Mail and follow the steps below to setup your email on Windows Live Mail with IMAP.
Example:
Name: Demo
Email Address: demo@lookafter.com
Type: IMAP
- If you are launching Windows Live Mail for the first time, you will be directly prompted to create a new email account. You can skip to step 3 from here.
Otherwise, go to the [Accounts] tab.
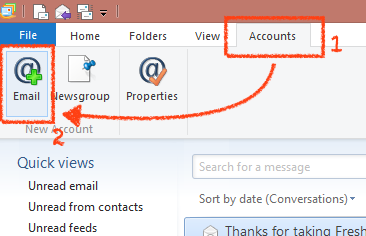
- Click [Email].
- On “Add your email accounts”, enter your email address on [Email address:].
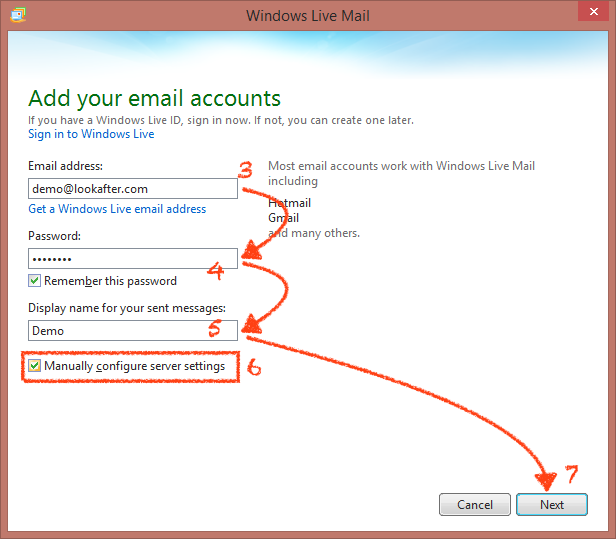
- Key in your email account password on [Password:]. Make sure that the [Remember this password] option is selected.
- Then, enter your name in the [Display name for your sent messages:] field.
- Check the [Manually configure server settings] checkbox.
- Click [Next] to continue.
- On the incoming server information (on the left column), select IMAP for the [Server type:].
- On [Server address:], key in your mail server, which is mail.yourdomain.com.
Make sure that the port number is 143 and do not check the [Requires a secure connection SSL] option.
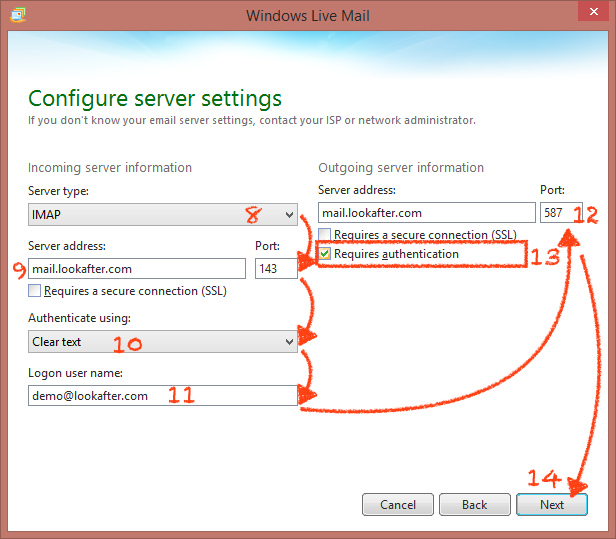
- Select Clear text for [Authenticate using:].
- Key in your full email address on [Logon user name:].
- On the outgoing server information (on the right column), key in your mail server on [Server address:], which is mail.yourdomain.com.
Key in 587 for its [Port]. - Check the [Requires authentication] checkbox.
- Click [Next] to proceed.
- Your email account has been successfully added. Click [Finish] to close the window.
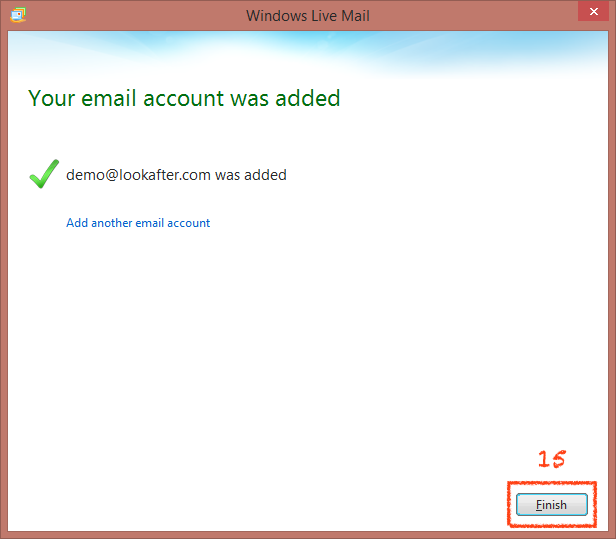


Now, you can access your emails from your Windows Live Mail.

faq/email/mail_setup_win_live_mail_imap.1438656626.txt.gz · Last modified: 2015/08/04 10:50 by vikki
Except where otherwise noted, content on this wiki is licensed under the following license: CC Attribution-Share Alike 4.0 International
